Getting Started with Fresh Projects - Monitoring your Project Plan to Completion (5 of 5)

Part 1 - Company Setting
Part 2 - Projects and Fees
Part 3 - Plans
Part 4 - Timesheets
Part 5 - Monitoring & Adjusting the Plan

In this final post of the series on Getting Started with Fresh Projects, we will 'close the loop' and show you how simple it is to stay on top of your project plan to guide your project to a controlled and hopefully profitable completion.

Overview of All Projects

On the Projects page, you will see a list of all your projects:


The bars alongside each project give a very quick indication of how the project is performing overall.  The top bar shows the income (both actual and total fee) while the bottom bar shows costs (both actual and projected).  All projects where income exceed expense will have a green bar, proportional to the amount of expected profit, while jobs where expense exceeds income will have a red bar proportional to the extend of the loss.

Updating Percentage Completion 

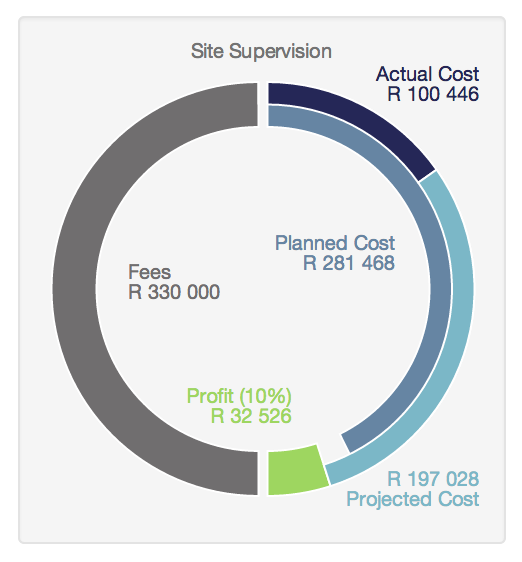
As approved time and other expenses get captured to your Active project, the Fresh Projects Profit Indicator will update to reflect the new status of the project with the added costs included :
In the example above you can see how the time approved in the previous step has now introduced Actual Costs to the sub-project.  At this point in time the Projected Cost  is still equal to the total planned cost  (which is resulting in a forecasted loss) as we have not updated our percentage complete. This is done in the Actual Labour Cost & Estimate to Completion section of the plan:


So, in the above example,  even though we have expended 36% of our budget in labour cost, the percentage complete has not been adjusted as yet (it is set to 0%). Adjusting it is a simple matter of dragging the slider to the % that you as the Project Manager feel the Sub-Project or Phase has achieved :

As you adjust the % complete you will see that the Cost Planned to Completion will reduce accordingly and the Fresh Projects Profit Indicator will adjust in line with the new estimates :
Once you have made the appropriate adjustments to either the percentage complete or your overall project plan (you can still adjust the project duration and resource allocation) and saved your changes, your employees will automatically see the new planned hours  and hours remaining that are specific to them when they complete their timesheets.

The exact same process to set % completion for your Other Costs  (disbursements, sub-consultants, etc) is followed by dragging the slider in the  Other Costs box as your actual costs build up.

Wrapping Up

Hopefully you have seen through this series of posts how Fresh Projects provides a simple platform for you to easily plan, cost, measure and manage your projects to ensure that they result in a the best possible outcome for you and your company. There are tons of other features in the pipeline that will be released over the upcoming weeks and months, including :
  • Reports, both summary and detailed, on project profitability across your company
  • A Gantt chart view that shows how your resources are allocated across all projects 
  • A Bottom Up Planner that allows for more detailed planning
  • Smartphone apps that make timesheet capturing and approval 100 times easier
  • Interfaces for uploading actual income and expenses from your accounting system 
We hope you enjoy using Fresh Projects as much as we enjoy creating it. Please contact us at support@freshprojects.co.za with any questions of comments.

Final Note on Importing Projects

We realise that every company has a long list of projects already underway, all in various stages of completion. We have specifically developed Fresh Projects to allow you to import your projects - and allocate a starting point for projects already underway (both in terms of cost already incurred and income already earned). Contact us if you wish to discuss how we can do this for your company.


Getting Started with Fresh Projects - Timesheets (4 of 5)

Capturing Time

Fresh Projects has first-of-a-kind closed loop  timesheet functionality that includes the following unique features:

  • If an employee has been planned on a specific project, his timesheet will automatically be populated with that project.  Furthermore each project has a traffic light indicator that shows the employee what projects are fee earning (green) and which ones are not (orange). This provides a simple yet direct method for your employees to know what projects they should be working on at any given time.
  • The timesheet also spells out to the employee exactly how many hours have been budgeted for him to perform the specific sub-project, phase or work package. The Total Actual and Remaining Planned hours automatically adjust as the employee captures his time - giving instantaneous feedback to him on how much time is left for him to complete the task.

  • Employees can optionally provide feedback to the project manager as they complete their timesheet as to their own estimation of task completion by adjusting the Estimate % Complete field. Once again, instant feedback is provided by the conditional colour formatting when the employee's estimates either exceed  (red) or are less than (green) the budgeted amount of hours. 
  • Fresh Projects follows is singularly focused on ensuring that you are able to get the most accurate picture of how your projects are performing. We therefore intentionally do not prevent any employee form capturing time on any project - even if they were not planned as a resource for that project. This is to avoid cases of employees who might have been pulled in to help for a few hours on a project rather capturing time to the wrong project than having to go through the administrative burden of getting themselves added to that project. Employees can therefore add any other projects, including overheads, to the timesheet :
  • As the employee fills out his timesheet the Direct Time Indicator updates in real time to give instant feedback on his achieved utilisation :
With the various feedback loops described above, Fresh Projects' aims to make all employees aware that their time spent on various projects and activities has a direct impact  on the company's ability to reach it's planned delivery targets.

Approving Time

All hours captured to a specific project are sent to the Project Manager of that project for approval:


The Project Manager can quickly see on a weekly basis if any of his planned projects have issues as the employee's Estimate to Complete feedback will be highlighted in red if it exceed his planned allowance. The Project Manager can also see at a glance what his total planned vs actual hours are for the specific employee and project.

Any time captured to Overheads is sent the the employee's Line Manager for approval:

For both Project Time and Overhead time the approver can click on the tick button to approve or the cross button to reject the timesheet entry.  If an entry is rejected, an optional reason for the rejection can be provided that the employee will see when he reviews his rejected timesheet.

Only approved time will be costed and allocated to the Project's Actual Costs.

Read on for the final entry on Monitoring and Adjusting the Plan


Getting Started with Fresh Projects - Plans (3 of 5)

Using the Simple Planner

Switch to the Plan tab. The Simple Planner should be selected by default.

The Simple Planner calculates your resource cost at a very high level : it assumes a constant, averaged labour input over the life of the project. As such it is very easy to configure as to get started you really only need to add two items of information :
  1. Set the Project Duration by typing in the duration and selecting a unit (days, weeks or months)
  2. Add the resources you wish to allocate to the project by clicking on the + icon at the top right of the Resource Box. You can select either generic resources or specific employees, or a combination of the two:


For each resource, simply drag the 'Level of Involvement' slider to change their intensity level for this specific project. For example, if the resource will spend on average 10% of his time on this job, drag the slide down to 10%. Fresh Projects will show you what this translates to in actual hours per day or hours per week as you modify your selection.

Fresh Projects automatically includes the additional costs of both the specific resource's utilisation factor and the company overheads - so the total Labour Cost for the project will be the actual, all-in costs that your company will need to pay to deliver the project. This is the cost that needs to be contrasted against your fee income in order to really know if your project will be profitable or not.

The Fresh Projects Profit Indicator will update in real time as you change the project duration or add resources and adjust their intensity to give you an instant picture of just how profitable you can expect your project to be. 

Adding Other Costs

If you have  any other project costs (e.g. sub-consultants, disbursements or material costs), you can add them to the Other Costs Box by clicking on the + icon at the top right of the Other Costs box:

Any costs added here are also included instantaneously in the Fresh Projects Profit Indicator.

Once you are comfortable that you have included all your resources and other costs, you could go ahead and adjust the discount (on the Fees tab) you feel you can offer that will cover your costs and profit a reasonable profit margin on the job.

Using the Phased Planner 

While the Simple Planner is great for quickly determining you project costs at a high level, it can be difficult to plan projects of a longer duration. The Phased Planner has the  same simple usability but allows you to  introduce different phases to the project, which may have differing resources, levels of intensity and other costs.

Simply choose the Phased Planner option from the planner dropdown, add new phases by clicking on the + icon next to the list of phases and follow the same process described above to create you cost plans.

Once your projects are in place, you are ready for your employees to start capturing time against them.

Getting Started with Fresh Projects - Projects & Fees (2 of 5)

This is Part 2 in a 5 part series on configuring, planning and managing the costs on your professional services projects using Fresh Projects.

Part 1 - Company Setting


Creating Projects

  1. Click on the Projects link at the top of the page. To start with you will have no projects listed.
  2. To create a new project click on the 'New Project' button at the top right of the page.
  3. Give your project a Name and Project Code. To start with you will have no clients in your database, so click on the plus sign next to the client field to add a new client. Later on, if you have already added the client, simply start typing the client's name and al list of matching clients will appear for you to select from.
  4. The Fees and Plan tabs at this, the Project Level (Top Level) are simply read-only summaries of the sub-projects. The real detail is added at a sub-project Level

Adding Sub-Projects

  1. The first sub-project is added automatically (there always has to be at least one), but you can add further sub-projects by clicking the link at the bottom of the list on the left hand side. Sub Projects can either be different disciplines (if the project is multi-disciplinary), different project phases  or event different contracting terms (e.g. disbursements).
  2. To set the Project Manager, simply start typing his or her name and select from the resultant list of matching names.  It is important to set a Project Manager for each project from the outset, as any time booked to this project will be sent to the Project Manager for approval before it is registered as an actual cost.
  3. In the General tab, you can rename the sub-project and give it a description. The Status field plays an important role in the project lifecycle :
    • Opportunity : the default starting value. This means that the sub-project is not a fee earning job yet, and all time booked against opportunities will not count against the employee and company's Direct Time Ratio (utilisation). 
    • Active :  set the sub-project status to Active once it has been 'won' or you have been appointed. Only Active (i.e. fee-earning) sub-projects count towards employee and company Direct Time.  Also, once a project has been set to Active, a number of further controls will be enabled to allow you to manage the estimates to completion (see the last article in this series).
    • Dormant and Completed : are used if the project has either been put on hold or has been completed. While it is possible to book time  against Dormant or Completed jobs, they do not count towards the Direct Time Ratio. 

Setting the Fee Value

  1. On the Fees tab, you can set the fee value. At the moment there are 3 options available to do so:
    • If the fee value is already known or agreed, simply type it in the Full Fee Value field. 
    • If you wish to use the 2014 ECSA Fee Guidelines, select 'ECSA 2014 V1' from the Calculator dropdown and make the appropriate selections using the easy calculator to determine the guideline fee.  
    • If you wish to use the 2012 SACAP Fee Guidelines, select 'SACAP 2012 V1' from the Calculator dropdown and make the appropriate selections using the easy calculator to determine the guideline fee.  
If you wish to apply a discount, you can do so in the discount field and the final fee value will be automatically calculated. However, it is recommended that this is only done once you have completed your resource plan (see next section) so that you can be sure that your discount does not result in a loss-making project.

As soon as you have either entered or calculated a fee, you will see that the Fresh Projects Profit Indicator will appear on the left hand side of the page:
At this point in time we have not added any costs to our project so the Indicator is showing a (wonderful, but unrealistic) 100% profit margin.

Generating a Fee Letter


Once you have settled on a Fee value, you can quickly generate a fee letter by clicking on the PDF button at the top right corner of the page.

  • If you have a sub-project selected, the fee letter will be for only that sub Project
  • If you have the Project selected (top level), the fee letter will be generated for all sub-projects, including a coversheet with your company logo.


Read on about Creating Resource Plans

Getting Started with Fresh Projects - Company Settings (1 of 5)

Part 5 - Monitoring & Adjusting the Plan

This is the first in a 5 part series of posts that will take you through setting up and using Fresh Projects to manage your projects effortlessly.  

Enabling the New App

  1. Go to https://app.freshprojects.co.za
  2. If you are already logged in to Fresh Projects from an earlier session, click on the Sign Out button in the top right corner
  3. Sign in to Fresh Projects by clicking on the 'Sign in with LinkedIn' button

Setting Up Your Company

  1. First set up all your Job Categories in your company (e.g. Director, Engineer, Draughtsman, etc) by going to Company > Job Categories
  2. You can add new Job Categories by clicking on the 'Add Job Category' button in the top right corner. 
  3. For each Job Category, you will be asked to enter the default settings for that category. These settings  will be used whenever you add generic resources from that category to a project plan.
  4. Make sure you click on the Save button before moving on.
  5. Secondly, add all Employees in your company (Company > Employees) 
  6. While the Hours Per Day, Days Leave, CTC and Direct Time Ratio are loaded from the Job Category defaults,  they can be overwritten for each individual employee - allowing you to achieve much more accurate costings on your projects.
  7. Over time Fresh Projects will automatically calculate the exact Direct Time Ratio (or utilisation) for each employee, however the value you enter here is initially used before a sufficient history has been captured.
  8. If you are not sure what each field represents, hover your mouse over the entry box to get a helpful hint.
  9. Don't forget to Save your changes as you go.
  10. Finally, you need to configure your Company Settings (Company > Settings)
  11. Again, Fresh projects will automatically calculate your company's overhead ratio over time, but an initial starting point is required.

Company Overheads

  1. To add overhead projects, click on Company > Overheads, then click on the New Overhead button at the top right of the page.
  2. You can add sub-categories to your overheads, for example :
  3. Click on the Save icon to save your changes.
Now you are ready to proceed to Creating Projects